Artwork Guidelines
If you require any assistance for supplying your own files don't hesitate to contact us. Files supplied in RGB/Microsoft Programs will not guarantee colour matching. This is due to the nature of colour conversion, however we aim to match them as close as possible. Please remember that desktop inkjet printers that are present in the home are not accurate at producing colours when compared to commercial printers. If you feel this is of concern please contact us before we print your order.
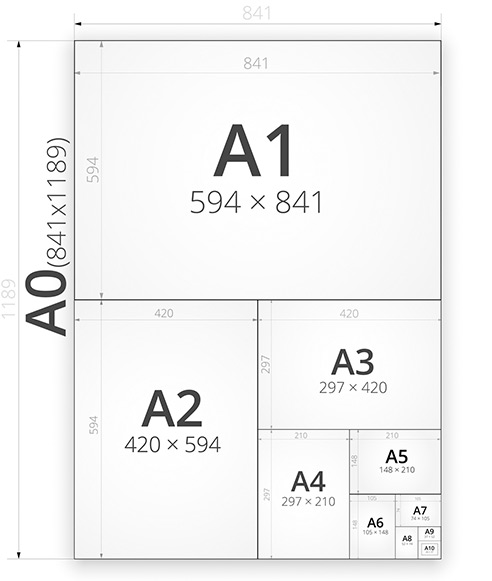
Common sizes

PDF Files
The easiest and quickest method for supplying artwork is to save it as a PDF.
- 300dpi resolution
- Ensure images are all high resolution
- CMYK workspace
- Embed any custom/all fonts or outline in the design program

Microsoft Office Files
Need A Print can accept Office files however we accept no responsibility in any alterations that may occur during the conversion. If Need A Print do the conversion we cannot be held responsible for things moving/dropping. It is best you convert to PDF as below.
If you wish to convert to PDF before supplying your artwork you can either download a PDF FREE printer here at www.pdf995.com or by a web service here: http://convert.neevia.com/
We cannot guarantee colours from any Microsoft application. This is due to Microsoft not being a graphic design application and ink values are not exactly matched to what you see on screen. We do however try to match them as best we can.

Adobe Photoshop
- 300dpi resolution
- 3mm bleed added to the final "canvas" size e.g. A4 finished size is 297x210mm but photoshop "canvas" size is 303x216mm.
- CMYK Workspace
- Save as a photoshop PDF and select the "High Quality Print" preset for the PDF.
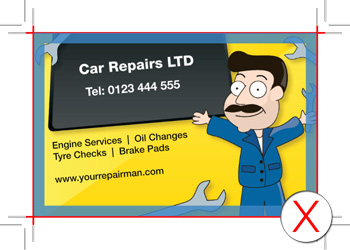
Bleed/ Safe Margin - What is this?
We require a bleed area and safe margin to allow us to print and cut your printed items. A minimum of 3mm bleed is needed with a 5mm safe area minimum

Correct: File has bleed to outer marks. Red line is where we cut. Background will print to edge. No text is inside the safe area (marked in blue)
Wrong: The file has been setup to the exact finished size. We need a bleed of 3mm minimum on all files. If we print and trim like this it will result in white areas at edge of print.

Wrong: You will see this file has bleed but the text is placed inside the 5mm safe area (marked in blue). There is a chance when we cut (marked by red line) it will cut the text off on some of your printed items.

Adobe InDesign
- 3mm bleed
- CMYK
- Convert all fonts to curves/outlines when supplying InDesign File
- Supply either InDesign File (with fonts converted) or Adobe PDF. When saving as PDF ensure you select "High Quality Print" preset and also in marks and bleeds select "Use Docment Bleed Settings" so that bleed gets included in saved PDF

Adobe Illustrator
- High Quality 300ppi for Raster Effects
- 3mm bleed
- CMYK
- Convert all fonts to curves/outlines if supplying eps file. Images Embedded
- Supply either EPS (above point required) or Adobe PDF. When saving as PDF ensure you select "High Quality Print" preset and also in marks and bleeds select "Use Docment Bleed Settings"